Showing posts with label how to. Show all posts

Tuesday, July 24, 2018

Hourglass Block Tutorial + Easy Star Table Mat


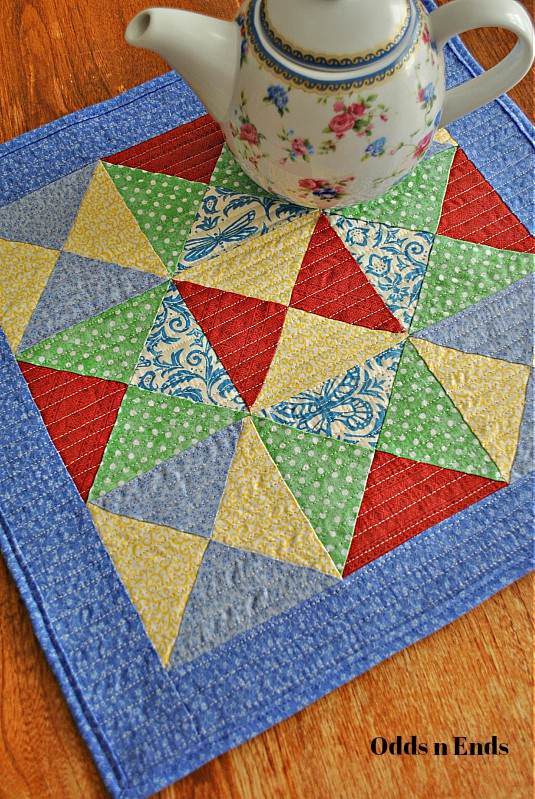
I have a quick and easy tutorial for you all today! I'm going to show you how to make scrappy hourglass blocks and put them together into some fun designs. You'll then have a 12" block you can use for any project like a pillow cover or table mat, as I'm going to show you today, or even make a bunch of them for a quilt! At first mine was going to be a pillow cover, but it was begging to be kept simple. So I just bound it and now it's a cheery table mat for my sister's tea time and bead-crafting and who knows what else! :D


I have a very large scrap pile of fabric, growing larger everyday! I thought it would be fun to show you some quilting tips as well as share this project for those last minute gift ideas we crafter's always need! ;) This pattern is made to be pre-cut/charm-friendly, fat quarter-friendly, and scrap-friendly...so you may use whatever materials you have on hand. I chose to use a combination today.


You'll need:


*All seams will be 1/4-inch unless otherwise noted.

Let's get started!

1. For Fat Quarters or Yardage: cut them down into 5x5 inch squares. How many squares you need will depend on which design you choose...I'll get to that in a moment.

For Scrap Pile: You can't always get a 5-inch square from your leftover pieces of fabric in your scrap pile...at least I can't! I took one of my 5x5 inch squares and cut it into triangles, as I'll show you below. Then I had some too-large triangles left over from another project and simply trimmed them down using a triangle from my cutout 5 inch square as a template for sizing.
I've used a combination of pre-cut charm squares, cutout squares from yardage, and pieces from my scrap pile in this tutorial. What can I say, I love variety! 

2. Cut: With your 5x5 inch square or charm square, cut a diagonal line from one corner to the other, in both directions. You'll have 4 triangles. Do this with each of your 5-inch squares.


A beautiful pile of colorful triangles ready to piece together! 


 3. Choose 4 triangles and set them together as you see below. This is an hourglass block! An hourglass block is one of those basic patterns that when combined together with more hourglass blocks, or other style block patterns, can create a much larger and intricate design.
 
There is SO much you can do with an hourglass block. You can have fun with fabrics and color designs to create a different design! Here are 3 design options you can try if you'd like. I've chosen the star, but you can create a playful scrappy custom design all your own by trying the dual-color hourglass or chevrons designs below. (if you choose the chevrons, you will need to cut along the sides - called "squaring up" - to make an even edge).


Choose where you want your fabrics and colors FIRST, then sew together. That way you'll ensure to have the block the way you want! I chose the green with white dot print to show off the star design. You'll need 36 triangles to create a 12-inch finished block.
 Today we're going to set the hourglass blocks in rows of 3x3 to create a 12-inch star block you can use to create a table mat, pillow cover, or set with more star blocks for a whole quilt! 


4. Sew Triangles Together: Set 2 triangles pattern sides (pretty sides) together...this is called "right sides together". You'll be sewing one short side, on the right there.


To create a perfect 1/4-inch seam allowance, I like to stick a piece of tape down as a guide. To do this, put your needle in the down position. Next measure out 1/4-inch from the needle point and place the tape down at the 1/4-inch mark. When you sew, keep your fabric edge along this line and you'll have a perfect 1/4-inch seam allowance every time!


Stitch a 1/4-inch seam along one short side of your two triangle pieces.


 When doing so many pieces that are all the same size and shape, I like to sew in a continuous strand, without cutting the threads. It gives a little less thread waste and makes things go a bit faster. Just be careful not to mix up the direction of the triangles as you sew when using this method!


 Press your seams to the side, against the darker side of the fabric. DO NOT iron back and forth, as this distorts the fabric shaping. Just press down for a few seconds and lift directly back up again.


Continue sewing until all the triangles are sewn together in sets of two's.

5. Once you have sewn together all your sets of two triangles, it's time to piece the sets together into a block.


To properly put the two halves together, we're going to "nest" the seams together. The pressed seams should rest on opposite sides and fit snuggly and neatly together. The point should match up and then you can pin in place.
You may need to re-press the seams if they do not nest with the seams on either side like this. The dark sides sometimes match up instead of being opposite...just press to the other side and try again.


Pin the nested seams in place in the center, and at each end if you need.


Sew along the length, and continue these steps until all the hourglass blocks are completed. 


You should have a nice little 4-1/4 x 4-1/4 inch hourglass block.


Tip: To help the hourglass blocks lie flat more easily, I like to seam rip the center a bit at the join. Carefully stick your seam ripper in at the join, just above and beside the stitching. You don't want to rip the stitches out, just the material! Then rip in an upwards motion to create a small slit. Press this open to either side so your block is flat and neat.


6. Sewing Rows: Pin two blocks, right sides together along the sides, at the corners. You want to match seams here just like you did earlier...with the seams on the front and back lying to either side at each corner so they nest neatly together. Sew in sets of two for each row. Then add the remaining hourglass blocks from each row, to the end of each row.


You should have three rows sewn together.
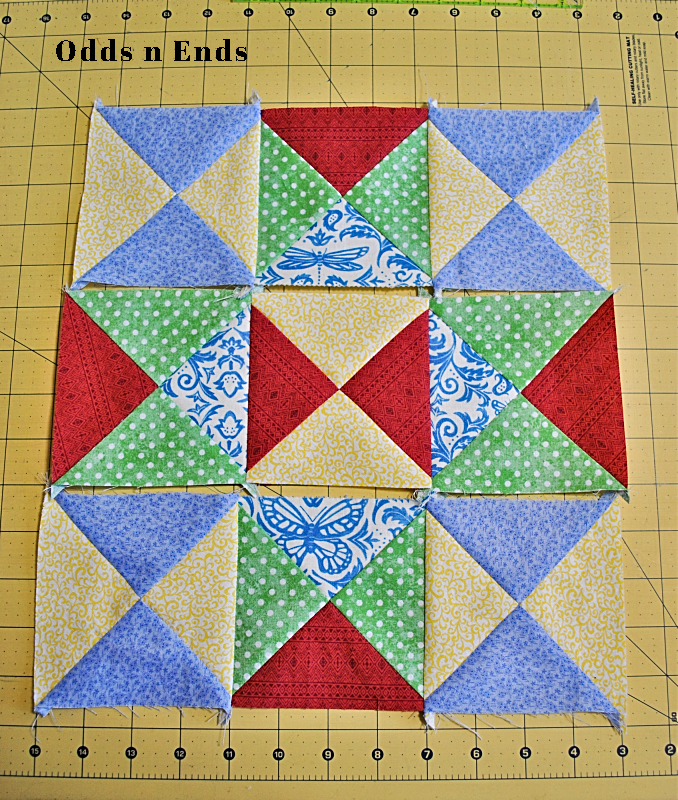


Here is a view of the front and back! Everything should look neat and flat.
Press flat the seams you just sewed, as you see below, so the rows will nest neatly together in the following step. Press it - outside, inside, outside. ;)


Next, we're going to clip the corners, or the "dogs ears" as quilter's call them. :D You only do this as the last step, after the seams and blocks are pieced together. Otherwise it's harder to match seams neatly after cutting them off. Now, simply cut just the tips from the inside and outside of the blocks...the part that hangs off the edges as below.


 Lastly, sew these rows together, right sides together.

Congratulations, you should now have a 12-inch block! 

You can turn this into anything you want or even make more blocks.
Or, continue with the directions for a simple table mat!


7. Table Mat Borders: Cut two 12-1/2 x 2 inch strips for your borders. Line up, right sides together...if you have a special direction of the fabrics of your block, these will be the top and bottom strips. Pin at the seams to be careful to keep your seams flat when you sew. Sew borders to your block with a 1/4-inch seam allowance.


Cut two 14-1/2 x 2 inch strips for second border. Line up right sides together. Pin at all seams; stitch with 1/4-inch seam allowance.


8. Quilt: Lay your bordered block on some batting. I use Warm and Natural 100% cotton batting for all my quilting products in my shop and my crafting. Leave a little room on all sides. Lay your yardage underneath your batting, and cut with a little space on all sides past the batting for a backing.
You should now have 3 layers: top, batting middle, and yardage backing. Press your entire block once more to make sure all the seams are nice and flat...and iron the yardage for the backing.


Use curved safety pins to pin through all 3 layers of your table mat.

I was tempted to quilt something fancy for my table mat, but I decided to keep it simple with straight stitching. I used my walking foot attachment for my sewing machine and kept the quilting 1/4-inch apart. I love how it turned out! Even if you are a beginner you can do this! :D


9. Binding: To finish your table mat, you need to make binding to finish the edge. There are lot's of methods for binding, and you may have to practice and test out a few to find something you love. This is an excellent tutorial here on Craftsy.com you may follow to take you from start to finish with some varying methods you can choose from! I make my strips at 1-1/2 inches wide and machine-stitch.

You are finished!

Ta-da!!
A gorgeous table mat ready for tea time or decorating your side table or whatever your heart's desire!


The straight-stitched quilting creates a lovely smooth surface. 
I adore running my hands over quilting. It's so relaxing!


Thank you so much for joining me today! I really hope you'll try the hourglass blocks and create a fun new table mat for yourself, or as a gift! :D


If you enjoyed this tutorial and found it helpful, be sure to sign up for my emails on the sidebar! That way you can receive all my future quilt tips, tutorials, and special offers to my Odds n Ends Quilt Shop! :D
 Be sure to share this tutorial on your favorite social media sites so your friends can make one too!


Blessings to you!
~Rachel~

Monday, May 14, 2018

Creating Your Own Quilting Table


Once you begin your quilting journey you start to refine your needs and tools a bit better. You'll know what you use on a regular basis, you'll know your favorite techniques, and you'll have a few completed projects under your belt. But one thing I didn't see enough research about in quilt books and online when I began was the importance of a quilting table. I primarily machine quilt and I struggled through many projects, with sloppy free motion quilting and lot's and lot's of seam ripping before I discovered the trouble wasn't with me, it was my lack of a quilting table! I'll share more of this in a minute.


My dad was a HUGE help and created a lovely and very inexpensive quilting table insert that I use every day I quilt. It's amazing and makes my life so much easier! My quilting table is a board that easily inserts into our dining room table, as you'll see farther below, in a minute.

What is a quilting table?

A traditional quilting table is designed to give you extra space and a flat surface for quilting on your home sewing machine. You always want an even surface between your sewing machine and work surface areas so your heavy quilting won't be dragged down when you quilt the layers together (if you machine quilt, as I do). Ideally, you want one where your sewing machine rests inside the table or cabinet and your machine is even with the with the surface for a smooth surface.

Why do I need a quilting table?

For those of us who don't own a long arm quilting machine that needs it's own room (and is VERY expensive), we need something to help our home sewing machines carry the bulk of the heavy materials as they slide along when we quilt. You need a smooth surface when you quilt, especially when working on a large project. When I first began quilting, I often would have pulled, and messy stitching. Yes, sometimes that was my stitch gauge, but much of the time is was simply that gap of space between the table and my sewing machine!


See how high my machine is from the table? There are at least 4 inches of space above the table to the sewing machine plate there. That's an enormous gap that creates drag when quilting. The larger your quilt project, the more difficulty you will have creating neat stitching this way. You won't be able to move your quilting around freely as you quilt.


Are there different styles of quilting tables?

Absolutely! You can purchase small quilting tables that sit on your table surface. And there are various styles of diy quilt tables and cabinets you can purchase.When deciding on a quilting table for your own home, take into account where you will be doing your quilting, how much quilting you plan on doing in the future, and how large your projects will be.

If you won't quilt often, or on smaller sized quilting projects (not humongous quilts!) then a Sewing Machine Extenders that sit on top of your work surface and extends the sewing area around your sewing machine might be just the thing. These are raised up and better for quilting piecing blocks together than for the majority of bulky quilting, but I've read of many who use this method for their projects too with no trouble.

Then there are actual tables, or cabinets such as these where your machine can sit inside. That's much more what you want if you plan to do a lot of quilting, or work on large projects which are much heavier and weightier. However, not all cabinets are created alike, and if you want one to quilt with be sure your sewing machine not only fits inside, but sits level with the tabletop.A table style such as this became my choice and that my dad made for me. I can work on any project, small or large and have plenty of space to cut, piece, and quilt. There are a variety of cabinets and homemade variety's. I have a collection on Pinterest for inspiration if you'd like to see some more styles - there are some great idea's from other quilters! :D


Here is my quilting table:


My quilting table is our family's dining room table! We have a large table that pulls apart to add more leaves and seating. So all my dad had to do was create an insert to fit my sewing machine. The insert is quite large, a bit heavy but I can manage to place it together myself most days.

This is my insert that measures 24x42 inches to fit into our table and give me space for my sewing machine. You can see where it has been cut out. We measured around my sewing machine, then pencil marked the measurements on the wood. (If your machine comes apart at the front to make it smaller for sewing sleeves and such, be sure to take that OFF before measuring!) I have an old Kenmore so my measurements were: 3-1/2 x 6-1/2 for the very tip of my machine; then a 2-inch depth in the front and about 1-inch depth on the back side, and 7 x 11-1/4 on the long sides. If you look closely, you'll see a small notch on the 1-inch deep spot. That's where the attachment for the end of my sewing machine slides off and connects. Each machine is a little different, and you may need to make some adjustments for your own. :)


We ended by sanding the wood smooth, then shellacking the entire top and along the inside just where my sewing machine would sit. You don't want any splinters or spaces where your cloth can get caught!


To give my sewing machine something to sit on, we made a small stand that sits down inside the gap in the table. This measures 9-1/2 x 18-1/2 inches and is bolted in place underneath. The front section with the gears are is where our table pulls apart.


The hole was an addition we added later and sits directly beneath the area where the switch for my feed dogs is (those little "teeth" under the needle). As a quilter I change the feed dogs constantly from the up to the down position. Some sewing machines have this button or switch on the top where you can reach it easily, but unfortunately mine lie behind and under in the back. I used to have to move the table apart and reach around my sewing machine and under the insert EVERY TIME I needed to change the feed dogs to quilt! Bleck! So my dad drilled me a hole - now all I have to do is reach under and flip the switch! Yes!


Here's another look at how our table is put together - there are small pins on one side where we needed to drill a few matching holes for everything to fit together. This helps keep my insert from sliding apart too much, as well.


If you create your own table in a similar way, make certain your cutting measurements are accurate! The most important thing is to have your sewing machine rest snuggly in the space you created. There should be no gaps, and your machine shouldn't be able to slide around in the hole. Just tight enough to rest against it, but not so tight that you have to force it into place.

I LOVE having a large space to work! The smooth surface makes it easy to quilt everything from piecing blocks to entire quilts without any trouble.


If you are a quilter, I'd love to hear what you use to quilt on...do you use an extender, or some kind of quilting cabinet or table? Or do you hand quilt instead? 

What is your favorite method of quilting?


Thank you for visiting today, and I truly hope this tutorial has been of help to you.
Be sure to follow me on Facebook, Pinterest, and Bloglovin' for the latest news and posts! :D
~Rachel~

Wednesday, April 25, 2018

How To Sharpen Blunt Rotary Blades Cheaply


When I first began quilting I discovered how expensive it can be to buy the supplies and tools that will help you get started. Even simply buying the basic equipment, things can be pricey (use those coupons!). Not long after I bought my supplies and began quilting my first project, I happened upon a tip online for sharpening rotary blades, enabling them to remain sharp for a longer period of time.

Using this tip, I don't have the need to change my rotary blades very often. And I don't have to invest in a pricey rotary sharpener. I estimate I change mine every 2-3 months after constant use. This method gives me maybe another 2 months or more before I absolutely need to change the rotary blades. The great thing is, this method isn't expensive in the least, AND uses items you most likely have in your home already! It's awesome!


You will need:
* rotary cutter with blade attached (preferably used already, right?) ;)
* cutting mat (if you have an old one, it's perfect for this project!)
* aluminum foil - about 12-18 inches long


1. First you will want to pull out a piece of aluminum foil. Make it about 12-18 inches long. The measurements aren't exactly important. What you are going for is the thickness of the foil when we fold it in a moment. So therefore, the more you have the better. But you don't want it so thick you can't cut through it, so thus the above measurements. Don't stress it...this is going to be easy, I promise!


 2. Fold the aluminum foil in half, width-wise, then again length-wise. Fold over again and again until you have a little folded rectangle as in the image below. This is the beginning of the magic...


3. With your rotary cutter, carefully cut length-wise across the foil creating long strips. Don't worry about straight lines or cutting all the way through. What you are looking for is the rotation of the blade as it cuts. You want the blades to be as evenly sharpened as possible, so the more the blade turns around as you cut, the more evenly sharpened it will be.


Cut multiple lines across, evenly moving your blade back and forth, back and forth across the foil. I like to roll the blade backwards after cutting across, then move forward again so I can make sure it's really sharp. Continue cutting until the entire surface of the foil rectangle has been cut into shards/strips. (Don't worry about cutting all the way through the foil layers).


4. If your blade has not cut through the foil the entire way (mine is usually so dull it won't cut through!), you can fold it over again - be very careful as the shards of foil are sharp! Then you can make more cuts. You get more bang for your few cents this way. ;)


 Now you should have a nicely sharpened rotary blade! Sometimes I like to test the sharpened cutter on some fabric too, so I may see if it's been sharpened enough, and evenly. If it still needs some sharpening, you can always get another piece of aluminum foil and go through the process again. It only takes a couple minutes to do.

If you find that after using this method your blade still doesn't seem sharp enough and won't cut through your fabric, then it's most definitely time to insert a new blade, as according to your manufacturer's instructions (this process is also very easy to do, just be careful not to cut yourself).

I hope you find this easy tip for sharpening your rotary blades really helps you and saves you big bucks! :D