

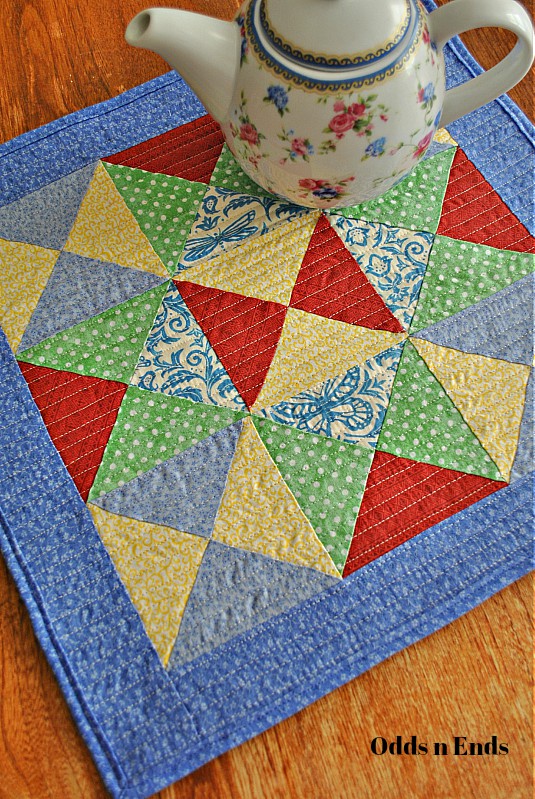
I have a quick and easy tutorial for you all today! I'm going to show you how to make scrappy hourglass blocks and put them together into some fun designs. You'll then have a 12" block you can use for any project like a pillow cover or table mat, as I'm going to show you today, or even make a bunch of them for a quilt! At first mine was going to be a pillow cover, but it was begging to be kept simple. So I just bound it and now it's a cheery table mat for my sister's tea time and bead-crafting and who knows what else! :D


I have a very large scrap pile of fabric, growing larger everyday! I thought it would be fun to show you some quilting tips as well as share this project for those last minute gift ideas we crafter's always need! ;) This pattern is made to be pre-cut/charm-friendly, fat quarter-friendly, and scrap-friendly...so you may use whatever materials you have on hand. I chose to use a combination today.
You'll need:
- 1 charm pack or 4 fat quarters in 4 colors (or a pile of scraps from your scrap bag)
- 20 inches of batting
- 1 yard coordinating fabric for border, backing, and binding
- your favorite quilting tools - rotary cutter, quilting pins, curved safety pins
*All seams will be 1/4-inch unless otherwise noted.
Let's get started!
1. For Fat Quarters or Yardage: cut them down into 5x5 inch squares. How many squares you need will depend on which design you choose...I'll get to that in a moment.

For Scrap Pile: You can't always get a 5-inch square from your leftover pieces of fabric in your scrap pile...at least I can't! I took one of my 5x5 inch squares and cut it into triangles, as I'll show you below. Then I had some too-large triangles left over from another project and simply trimmed them down using a triangle from my cutout 5 inch square as a template for sizing.

I've used a combination of pre-cut charm squares, cutout squares from yardage, and pieces from my scrap pile in this tutorial. What can I say, I love variety!
2. Cut: With your 5x5 inch square or charm square, cut a diagonal line from one corner to the other, in both directions. You'll have 4 triangles. Do this with each of your 5-inch squares.

A beautiful pile of colorful triangles ready to piece together!

3. Choose 4 triangles and set them together as you see below. This is an hourglass block! An hourglass block is one of those basic patterns that when combined together with more hourglass blocks, or other style block patterns, can create a much larger and intricate design.

There is SO much you can do with an hourglass block. You can have fun with fabrics and color designs to create a different design! Here are 3 design options you can try if you'd like. I've chosen the star, but you can create a playful scrappy custom design all your own by trying the dual-color hourglass or chevrons designs below. (if you choose the chevrons, you will need to cut along the sides - called "squaring up" - to make an even edge).


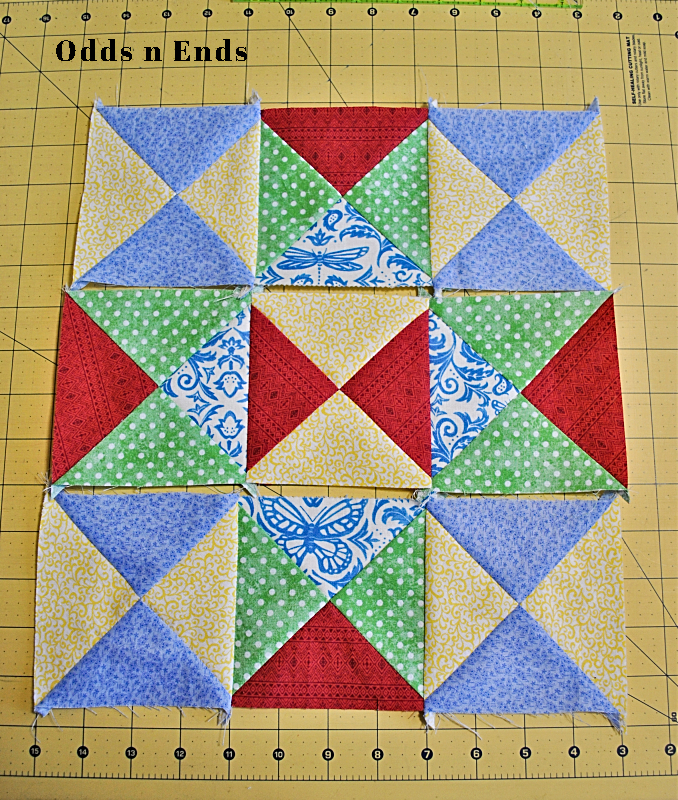
Choose where you want your fabrics and colors FIRST, then sew together. That way you'll ensure to have the block the way you want! I chose the green with white dot print to show off the star design. You'll need 36 triangles to create a 12-inch finished block.

Today we're going to set the hourglass blocks in rows of 3x3 to create a 12-inch star block you can use to create a table mat, pillow cover, or set with more star blocks for a whole quilt!
4. Sew Triangles Together: Set 2 triangles pattern sides (pretty sides) together...this is called "right sides together". You'll be sewing one short side, on the right there.

To create a perfect 1/4-inch seam allowance, I like to stick a piece of tape down as a guide. To do this, put your needle in the down position. Next measure out 1/4-inch from the needle point and place the tape down at the 1/4-inch mark. When you sew, keep your fabric edge along this line and you'll have a perfect 1/4-inch seam allowance every time!

Stitch a 1/4-inch seam along one short side of your two triangle pieces.

When doing so many pieces that are all the same size and shape, I like to sew in a continuous strand, without cutting the threads. It gives a little less thread waste and makes things go a bit faster. Just be careful not to mix up the direction of the triangles as you sew when using this method!

Press your seams to the side, against the darker side of the fabric. DO NOT iron back and forth, as this distorts the fabric shaping. Just press down for a few seconds and lift directly back up again.

Continue sewing until all the triangles are sewn together in sets of two's.
5. Once you have sewn together all your sets of two triangles, it's time to piece the sets together into a block.

To properly put the two halves together, we're going to "nest" the seams together. The pressed seams should rest on opposite sides and fit snuggly and neatly together. The point should match up and then you can pin in place.
You may need to re-press the seams if they do not nest with the seams on either side like this. The dark sides sometimes match up instead of being opposite...just press to the other side and try again.

Pin the nested seams in place in the center, and at each end if you need.

Sew along the length, and continue these steps until all the hourglass blocks are completed.

You should have a nice little 4-1/4 x 4-1/4 inch hourglass block.

Tip: To help the hourglass blocks lie flat more easily, I like to seam rip the center a bit at the join. Carefully stick your seam ripper in at the join, just above and beside the stitching. You don't want to rip the stitches out, just the material! Then rip in an upwards motion to create a small slit. Press this open to either side so your block is flat and neat.


6. Sewing Rows: Pin two blocks, right sides together along the sides, at the corners. You want to match seams here just like you did earlier...with the seams on the front and back lying to either side at each corner so they nest neatly together. Sew in sets of two for each row. Then add the remaining hourglass blocks from each row, to the end of each row.

You should have three rows sewn together.
Here is a view of the front and back! Everything should look neat and flat.
Press flat the seams you just sewed, as you see below, so the rows will nest neatly together in the following step. Press it - outside, inside, outside. ;)

Next, we're going to clip the corners, or the "dogs ears" as quilter's call them. :D You only do this as the last step, after the seams and blocks are pieced together. Otherwise it's harder to match seams neatly after cutting them off. Now, simply cut just the tips from the inside and outside of the blocks...the part that hangs off the edges as below.

Lastly, sew these rows together, right sides together.
Congratulations, you should now have a 12-inch block!
You can turn this into anything you want or even make more blocks.Or, continue with the directions for a simple table mat!
7. Table Mat Borders: Cut two 12-1/2 x 2 inch strips for your borders. Line up, right sides together...if you have a special direction of the fabrics of your block, these will be the top and bottom strips. Pin at the seams to be careful to keep your seams flat when you sew. Sew borders to your block with a 1/4-inch seam allowance.


Cut two 14-1/2 x 2 inch strips for second border. Line up right sides together. Pin at all seams; stitch with 1/4-inch seam allowance.

8. Quilt: Lay your bordered block on some batting. I use Warm and Natural 100% cotton batting for all my quilting products in my shop and my crafting. Leave a little room on all sides. Lay your yardage underneath your batting, and cut with a little space on all sides past the batting for a backing.
You should now have 3 layers: top, batting middle, and yardage backing. Press your entire block once more to make sure all the seams are nice and flat...and iron the yardage for the backing.

Use curved safety pins to pin through all 3 layers of your table mat.

I was tempted to quilt something fancy for my table mat, but I decided to keep it simple with straight stitching. I used my walking foot attachment for my sewing machine and kept the quilting 1/4-inch apart. I love how it turned out! Even if you are a beginner you can do this! :D

9. Binding: To finish your table mat, you need to make binding to finish the edge. There are lot's of methods for binding, and you may have to practice and test out a few to find something you love. This is an excellent tutorial here on Craftsy.com you may follow to take you from start to finish with some varying methods you can choose from! I make my strips at 1-1/2 inches wide and machine-stitch.

You are finished!
Ta-da!!
A gorgeous table mat ready for tea time or decorating your side table or whatever your heart's desire!

The straight-stitched quilting creates a lovely smooth surface.
I adore running my hands over quilting. It's so relaxing!


Thank you so much for joining me today! I really hope you'll try the hourglass blocks and create a fun new table mat for yourself, or as a gift! :D

If you enjoyed this tutorial and found it helpful, be sure to sign up for my emails on the sidebar! That way you can receive all my future quilt tips, tutorials, and special offers to my Odds n Ends Quilt Shop! :D
Be sure to share this tutorial on your favorite social media sites so your friends can make one too!
Blessings to you!
~Rachel~

No comments:
Post a Comment